
If you are a DistroKid user, currently you can add a Facebook pixel to HyperFollow pages but you can’t use DistroKid’s HyperFollow links to run proper Spotify Conversion ads for free.
Due to recent changes from Apple with iOS 14, Facebook has had to make changes to its Ads platform so that custom conversion events are pre-selected and are coming from verified domains.
DistroKid is not able to verify custom website domains with HyperFollow which is why it is not currently possible to run Spotify conversion ads with DistroKid HyperFollow links.
Although the DistroKid team is currently working on this, it is not currently possible to fully run Spotify conversion ads because you can’t verify your HyperFollow domain and create a conversion event for your Facebook Ads to optimize for.
In the meantime, you have 2 main options available to you:
- Learn everything you need to set up the Facebook Pixel for Spotify Conversion Ads regardless of which music link you want to use.
- Learn about the best alernative to the endless amount of smart music links like HyperFollow, Hypeddit, etc.
Also – I’ll be sure to update this guide when DistroKid makes this fix.
To learn more about this problem or to get a headstart on the first steps for setting up Spotify conversion ads with DistroKid, simply keep on reading, my friend. 🙂
Why You Can’t Use DistroKid HyperFollow To Run Spotify Conversion Ads
Here are the 5 steps that you need to complete to set up a Facebook Pixel for Spotify conversion ads using DistroKid HyperFollow:
- Create A Facebook Pixel Inside Of The Facebook Ads Manager
- Install The Facebook Pixel On To Your DistroKid HyperFollow Page
- Set Up A Custom Domain Inside Of The Facebook Ads Manager
- Set Up Custom Conversion Events Inside Of The Facebook Ads Manager
- Set Up Your Spotify Conversion Ad Inside Of The Facebook Ads Manager
Unfortunately…
HyperFollow is NOT currently set up in such a way that it is possible for you to complete steps 2 and 3.
Although DistroKid has said that they are working on a fix for this, there is no current timeline as to when this will be available.
…what is this iOS14 update anyway?
Due to recent changes from Apple with iOS 14, Facebook has had to make changes to its Ads platform so that you can only use conversion ads if:
- Conversion events are coming from website domains that are verified inside of the Facebook Ads Manager
- You are using 1 of 8 “configured events” using Facebook’s “Aggregated Event Measurement” tool
In the meantime, here is what you need to get a headstart on the first step for setting up Spotify conversion ads with DistroKid which is to create and install the Facebook pixel onto your HyperFollow links:
How To Create A Facebook Pixel For Advertising Your HyperFollow Link
The very first step is to actually create a Facebook Pixel so that you can start running ads to the music on your HyperFollow link.
It’s also important to note that you only need 1 Facebook Pixel per artist, band, or project – you do NOT need to create a new Facebook Pixel for each song or release.
Here are the 7 steps to creating a Facebook pixel for advertising your music:
- Login to your Facebook Business Manager account
- Click the hamburger icon (3 horizonal lines) on the left and select ‘Events Manager’
- Click on the green plus icon on the left or hover over the far left panel and click on the ‘Connect Data Sources’ (in green text)
- Select the ‘Web’ option and then click the blue ‘Connect’ button
- Select the ‘Facebook Pixel’ option and then click the blue ‘Connect’ button
- Click the blue ‘Connect’ button
- Enter a name for your Pixel, enter your website domain, and click the blue ‘Next’ button
For a more detailed look at these steps with screenshots, check out my article called How To Set Up The Facebook Pixel For Spotify Conversion Ads. 🙂
Once your Pixel is created, you just need to know where to find it so you can copy and paste it later.
Where To Find Your Facebook Pixel
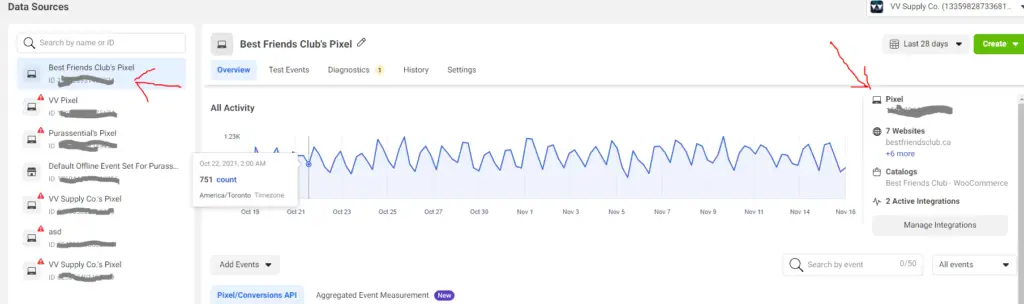
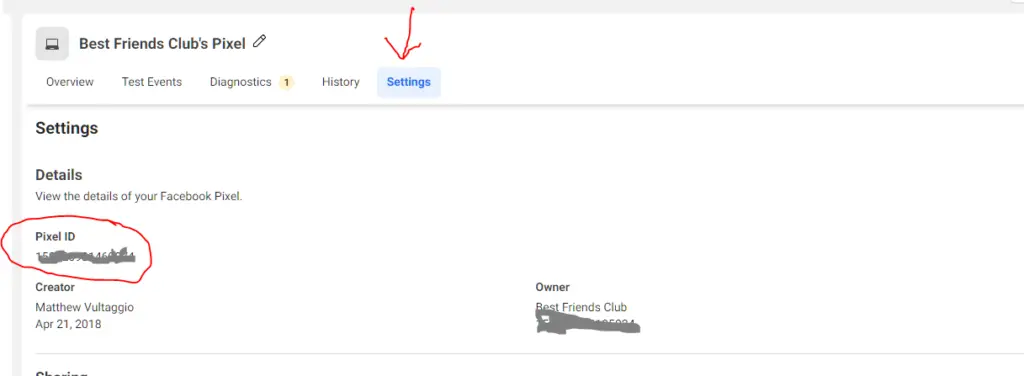
Once your Facebook Pixel is created, you can find your Facebook Pixel ID at any time by visiting the Events Manager page and finding it on the Overview page or the Settings page.
Here is where to find your Facebook Pixel ID on the Events Manager ‘Overview’ page:
Here is where to find your Facebook Pixel ID on the Events Manager ‘Settings’ page:
Once you have taken note of your Facebook Pixel, you are ready to actually install it onto your DistroKid HyperFollow links. 🙂
Installing The Facebook Pixel With DistroKid
To install the Facebook pixel with DistroKid, all you have to do is sign into DistroKid, edit your HyperFollow link, and paste your Facebook pixel into the Ad-tracking pixels section.
It is also important to note that you will need to add your Facebook pixel to each of the HyperFollow links you want to use (adding a pixel to 1 link will NOT add it to all of your others automatically).
Here are the 6 steps to adding the Facebook pixel to a DistroKid HyperFollow link:
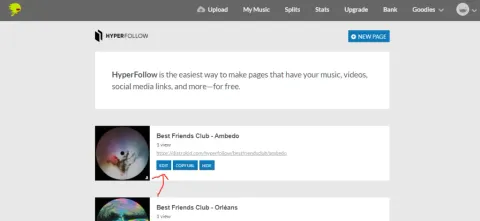
- Sign in to DistroKid
- Click ‘Goodies’ from the top navigation, select ‘Promote Yourself’, and then click “HyperFollow”
- Click the ‘Edit’ button on the song you’d like to add your Facebook pixel to
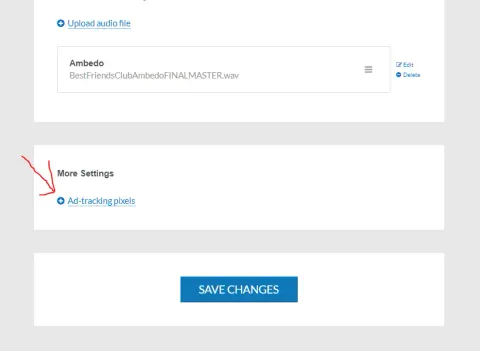
- Scroll down to the ‘More Settings’ section and select ‘Ad-tracking pixels’
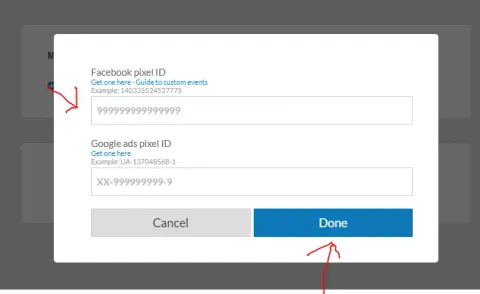
- Paste in your Facebook pixel into the ‘Facebook pixel ID’ field and select ‘Done’
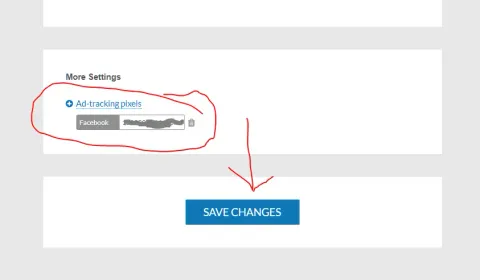
- Click on the ‘Save Changes’ button
Now let’s take a more detailed look at how you will be able to easily install the Facebook pixel into your Hyperfollow pages before looking at some other alternative options.
1 – Sign in to DistroKid:
2 – Click ‘Goodies’ from the top navigation, select ‘Promote Yourself’, and then click “HyperFollow”:
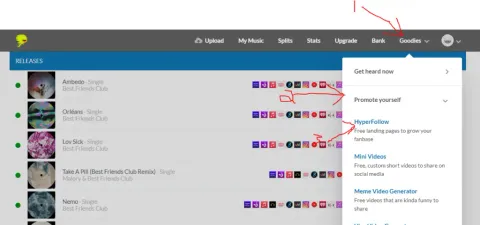
3 – Click the ‘Edit’ button on the song you’d like to add your Facebook pixel to:
4 – Scroll down to the ‘More Settings’ section and select ‘Ad-tracking pixels’:
5 – Paste in your Facebook pixel into the ‘Facebook pixel ID’ field and select ‘Done’:
6. Click on the ‘Save Changes’ button
Once the Facebook pixel is installed, custom events should now fire for you inside of the Facebook Ads Manager when your fans take certain actions on your HyperFollow link.
Here are all of the other custom events that DistroKid make available:
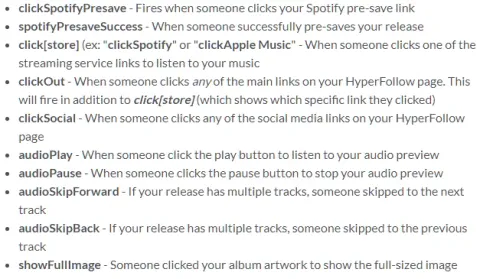
When running Spotify Conversion Ads, you will want to set up your Facebook Ad campaign so that it is optimizing for the “clickSpotify” conversion event.
My Recommended Setup For Spotify Conversion Ads
The best alternative to the endless amount of smart links, landing pages, and link-in-bio style pages out there is to simply build your own custom smart links by using WordPress.
For a free step-by-step course on how to get started with this (that also includes my own free templates), check out my free course on smart links for music.
If you already have a website or Smart Link solution in place, you can definitely use that, simply make sure to follow the following best practices.
Best Practises For Smart Links:
Make sure your Smart Link page is as simple and stripped back as possible with:
- The exact same album art that appears on Spotify (and ideally appears in your ad as well) on it
- Your artist name and song name on it
- Just one big button that says “Listen On Spotify” that links to your Spotify Profile on it
- The ability to add the Facebook pixel to your website so that you can use the Events Manager to attach the “View Content” event to that Spotify button
- No header navigation or footer navigation. The only option your listener should have to click is the Spotify button.
This free course on smart links for music also includes a breakdown of the strategy you need to follow to get great results with your smart links – regardless of which Smart Link solution you are using.
Spotify Ad Tracking Explained
To be able to properly run Facebook Ads to grow your Spotify streams, you need to make sure you have the proper ad tracking in place.
This is where the mighty Facebook Pixel steps in:
The Facebook Pixel can be installed onto your website or Smart Link pages so that the Facebook Ads platform can track when a fan or listener takes an action you want them to take (ie: streaming a song on Spotify).
This way, Facebook can show you how many results you are getting and how much those results cost.
Facebook can also use this data to leverage its powerful algorithm to “optimize” to find more of the type of people that are getting you those results and only serve ads to them – which lowers your costs.
…the problem?
The Facebook Pixel CANNOT be installed on Spotify.
This means you are not able to have the Facebook Pixel track exactly when a listener streams your song and optimize your ads around that highly specific event.
To get around this, this is the best practice for Spotify conversion ads:
Send your potential listeners to a Smart Link page first and set the ‘Conversion Event’ that Facebook will track and optimize for to be a “Listen On Spotify” button on that page.
So now you may be asking…
Why Not Use Ads To Send Listeners Straight To My Spotify?
Sending potential fans directly to Spotify greatly increases the chances of the Facebook algorithm optimizing around bots and click farm accounts instead of real fans.
Although Facebook Ads can be great, they have a severe issue with bots and click farms.
Using a “Traffic”, “Link Click”, or “Landing Page View” campaign dramatically increases your chance of wasting your hard-earned money on bogus results.
In addition to this, although sending potential fans to your website first increases the steps the fan has to take, it also increases the quality of that fan because they have taken more commitments to you.
Also – when a potential fan hits your website, you can track them with other tracking pixels (ie: Google ads, YouTube ads, Spotify ads, Snapchat etc) so that you can expand your advertising efforts beyond Facebook in the future.

