
If you want to be able to properly use the Facebook Ads platform to run Spotify conversion ads that grow your Spotify streams, you need to learn how to set up and verify a custom website domain.
Due to recent changes from Apple with iOS 14, Facebook has had to make changes to its Ads platform so that custom conversion events are pre-selected and are coming from verified domains.
There are 3 main steps to complete if you want to set up a custom domain so that you can properly run Facebook Ads for growing Spotify streams:
- Register a domain name
- Connect your domain to your website or music link tool
- Verify your domain with Facebook
Once this is complete, you can finish setting up your conversion events and completing the last steps need to use Facebook Ads for musicians that want to start growing their Spotify streams.
In this guide on setting up custom domains for music artists, I’ll show you how to complete all 3 of these steps so that you can get up and started as quickly as possible.
How To Register A Domain As A Music Artist Or Musician
A domain name is a website name/address/URL (ie: www.yourbandname.com) that points to a place where your website files are located which is called a web host server.
Your domain can be set to point to any web host sever, whether it is a full-blown website (ie: WordPress or Squarespace) or is just the pages you’ve built with a music link tool (ie: ToneDen or Hypeddit).
If you do not already have a website domain name, it can be fairly cheap and easy to register one with a company called a “Domain Registrar” today.
My Top 3 Recommendations Domain Registars
Here are my top 3 picks for you to check out if you need to register a domain name today:
- GoDaddy – what I use for my own domain and one of the more popular and credible options out there
- Namecheap – a credible and popular option that is worth checking out to see if there are any sweet deals
- BlueHost – a good option if you want a domain name and the ability to have a WordPress website installed on it right away (what I used when I first wanted to setup a website aka the website you are on right now!)
Ultimately, my recommendation would be to check out the links I provided here to see if there are any deals and just go for the option that gives you the lowest price but is still a popular and credible option.
Tips For Choosing A Domain Name As A Music Artist Or Musician
When it comes to choosing a domain for your music, I have just 3 simple tips for you:
- Keep it short: the shorter your domain name, the easier it is to type and remember.
- Keep it exact: keep your name as close to your artist name as possible to avoid any confusion.
- Use “.com” when possible: although more people are becoming used to seeing variations here, a .com is the easiest to remember, recognize, and use.
Do your best to hit these 3 points when choosing a domain name, but don’t stress out if you can’t find the perfect name.
In most cases, your fans and listeners will be clicking on links that you give them (via ads or other places you’ve pasted your links) rather than typing in your domain name by themselves!
How To Connect Your Domain To Your Website Or Music Link
Once you have created your custom domain, you now need to attach it to your website or music link tool.
If you are using a website builder like WordPress or Squarespace, you can likely skip this step since your domain is most likely already connected and ready to go.
This step mostly applies to artists that are using a music link tool such as ToneDen, Hypeddit, or one of the many options out there.
When connecting your custom domain, you have two options:
- Point the main domain to your music link tool (ie: yourartistname.com)
- Point a sub-domain to your music link tool (ie: music.yourartistname.com
Using a subdomain can be useful if you already have a main website and simply want to use a music link tool as well or if you want to be able to have a main website in the future.
Although this step will be unique to the music link tool you are using, it will likely be a feature called “custom domain” or “set up your own domain” that can be found in the settings.
What’s important here is to make sure you are using a music link tool that supports custom domains and that you are on the right plan for that music link tool that allows this feature.
In particular, a lot of music link tools that offer “free” versions limit features like this so that you are pressured to make an upgrade.
To see my review of free music link tools (which include breakdowns of if they have the right features) check out this article I made called Free Music Links: Your Guide To Free Smart Links & URLs For Music.
The article above also highlights my top pick for free music links, since it turns out that only 1 tool actually gives away all of the features needed to run Spotify conversion ads properly.
If you want to learn what your best choice is if you are looking for premium music links (or want to save a bit with the best budget option), check out this guide I made for you called: Music Links: The Best Smart Link Tools To Promote Your Music.
How To Verify Your Domain With Facebook For Spotify Conversion Ads
Now that you have your custom domain created and have connected it to your website or music link tool, the next step is to verify your custom domain inside of the Facebook Ads Manager.
As I mentioned earlier, Facebook has had to make changes to its Ads platform so that you can only use conversion ads if Conversion events are coming from website domains that are verified inside of the Facebook Ads Manager.
These are 7 steps to setting up a custom domain in Facebook for Spotify conversion ads:
- Login to your Facebook Business Manager account
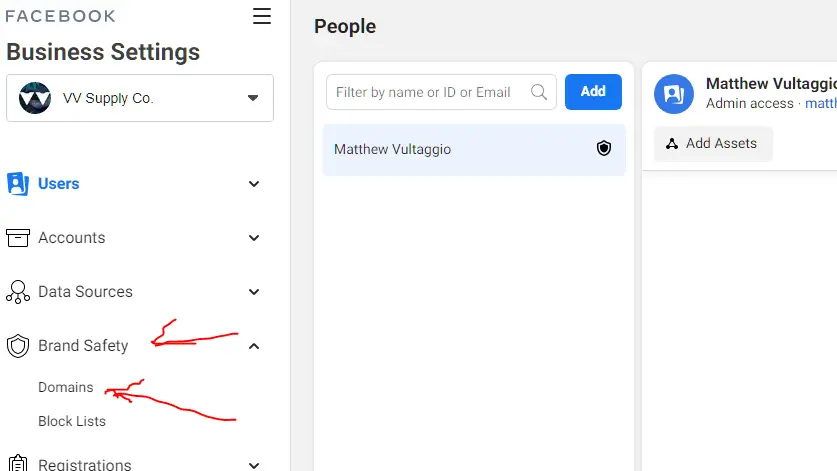
- Click the hamburger icon (3 horizontal lines) on the left and select ‘Business Settings’
- Click on “Brand Safety” from the left-hand menu and then select ‘Domains’
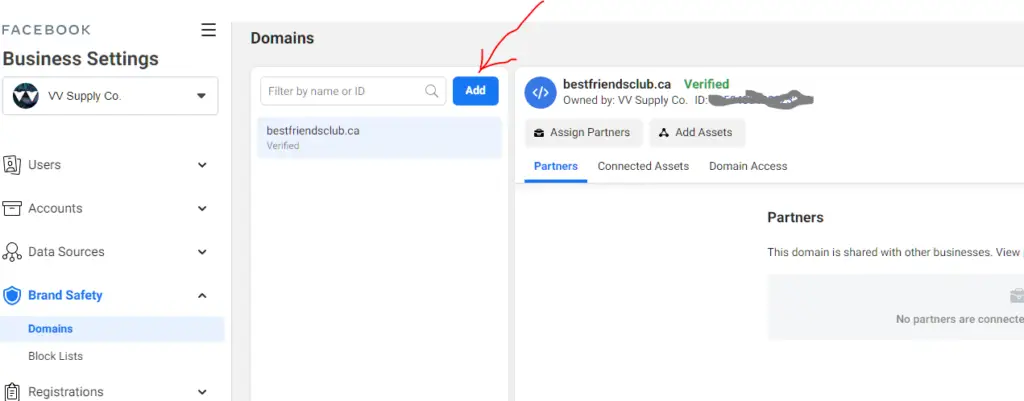
- Click on the blue “Add” button
- Type in the domain name that you own and click the blue “Add” button
- Choose one of Facebook’s verification methods (DNS, Meta, or HTML) and complete this inside of the backend of the service you used to register your domain name
- Click the green “Verify Domain” button and wait up to 72 hours for Facebook to complete the verification process
Although this process is relatively simple, watch out as Step 6 can be a bit difficult as you need to do a bit of technical work in your Domain backend.
Each Domain service’s backend will look a bit different, but I’ll show you how I completed Facebook’s verification method using the service that I used to manage my own website domain.
First, here is a more in-depth visual guide to completing the 7 steps for setting up and verifying a custom domain inside of the Facebook Ads Manager:
1 – Login to your Facebook Business Manager account
2 – Click the hamburger icon (3 horizontal lines) on the left and select ‘Business Settings’:

3 – Click on “Brand Safety” from the left-hand menu and then select ‘Domains’:
4 – Click on the blue “Add” button:
5 – Type in the domain name that you own and click the blue “Add” button:

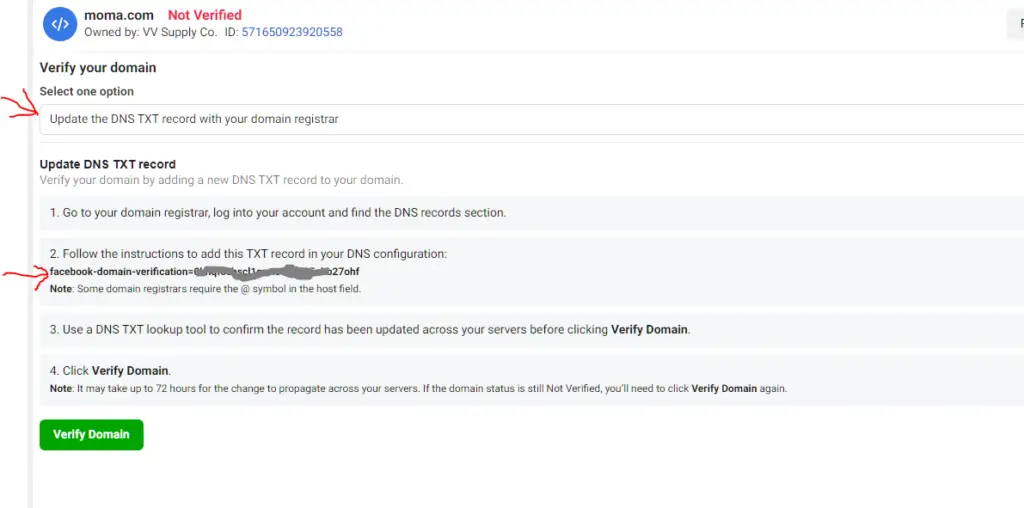
6 – Choose one of Facebook’s verification methods (DNS, Meta, or HTML) and complete this inside of the backend of the service you used to register your domain name.
For instructions on how to complete any of these methods, you can click on the ‘select one option’ dropdown menu just below where it says “Verify your domain”:

For more in-depth mini-tutorials from Facebook on how to complete each of the verification methods, click any of these links:
Or, simply continue reading to see how I completed this step using my own Domain service. 🙂
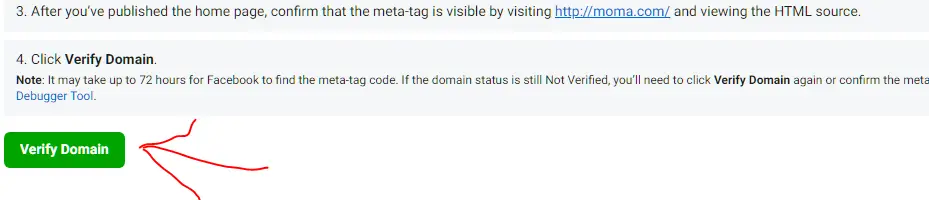
7 – Click the green “Verify Domain” button and wait up to 72 hours for Facebook to complete the verification process:
With that out of the way, let’s take a closer look at how you can actually complete Facebook’s verification method with your domain.
How To Verify Your Domain With DNS Verification
When I set up Facebook Ads for my own music, I chose to verify my domain using the DNS method.
Although each domain service will look just a little bit different, I will guide you through the steps I took to verify my domain inside of BlueHost.
When following along with your own domain manager, you may need to look for “DNS” or “DNS Manager” or “DNS Record” to find the area where you can update the required settings.
P.S. If you need help finding the right area, simply Google something like “YOURDOMAINPROVIDERNAME DNS records”.
With that out of the way, here are the 6 steps you will need to complete DNS verification using BlueHost:
- Login to your BlueHost account
- Click on “Domains” from the left-hand menu
- Click on the “Manage” button for the domain you wish to use
- Scroll down to the “TXT” section and click on the blue ‘Add Record’ button
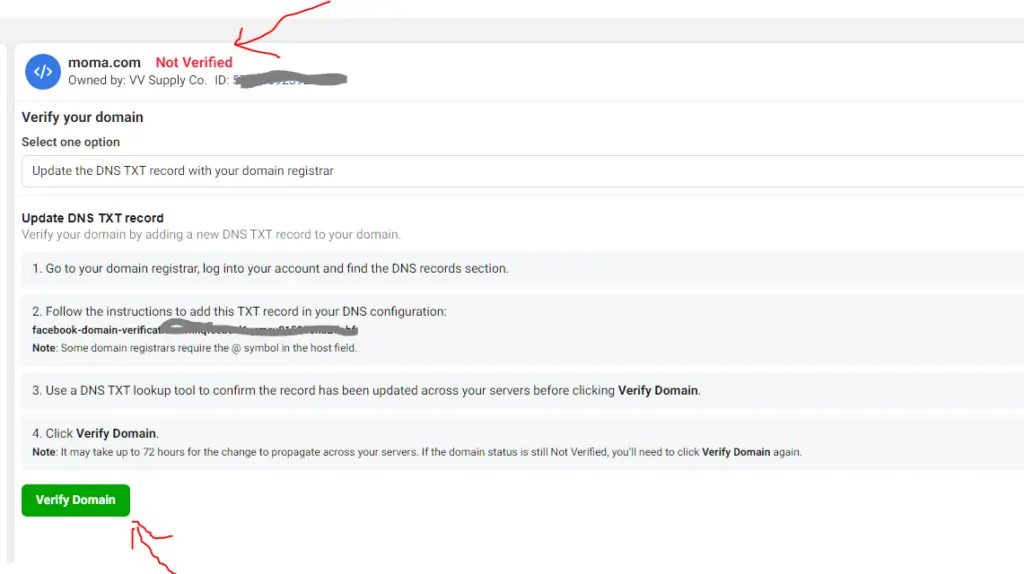
- Go back to the Facebook Business Manager, select the option “Update the DNS TXT record with your domain registrar” and copy the TXT record that Facebook lists in Step 2 of that page
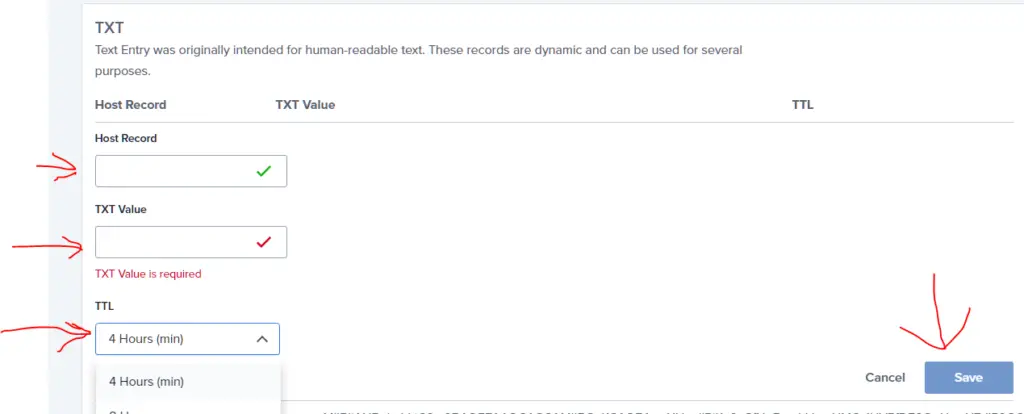
- Type an @ into the “Host Record”, paste the TXT record you just copied in Facebook into the “TXT Value” field, set the “TTL” dropdown to ‘4 Hours (min), and then click the blue “Save” button
After you have completed these steps, simply wait up to 72 hours for the verification process to be completed.
If your domain continues to say “Not Verified”, simply click on the green “Verify Domain” button again or double-check that you set up your TXT record properly:
Once your domain is verified, you can now proceed to the final step before you can actually create a Spotify conversion ad inside of Facebook, which is to set up Aggregated Event Measurement inside of the Facebook Ads Manager.
First, for a more detailed look at how to complete each of these steps, simply keep on reading.
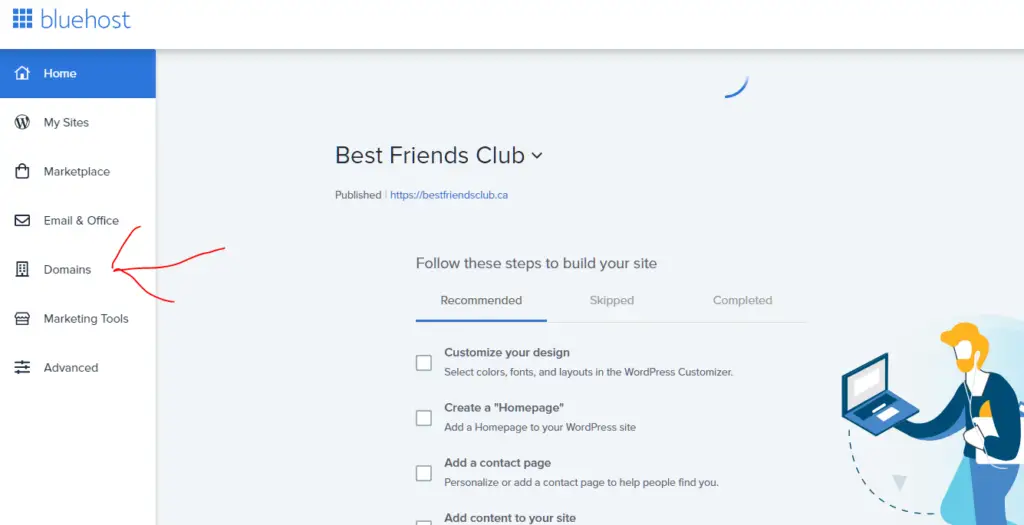
1 – Login to your BlueHost account:
2 – Click on “Domains” from the left-hand menu:
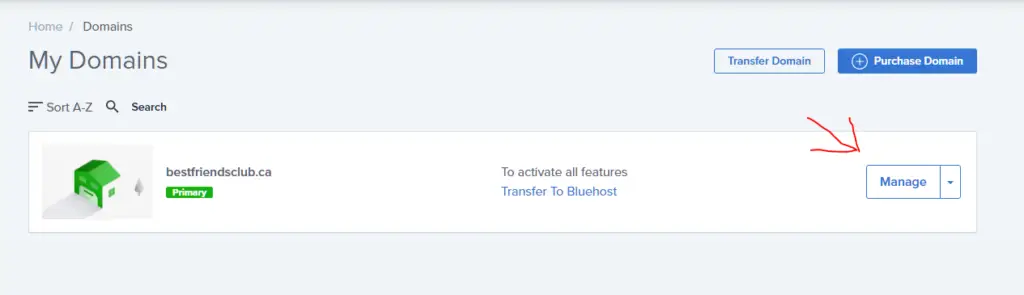
3 – Click on the “Manage” button for the domain you wish to use:
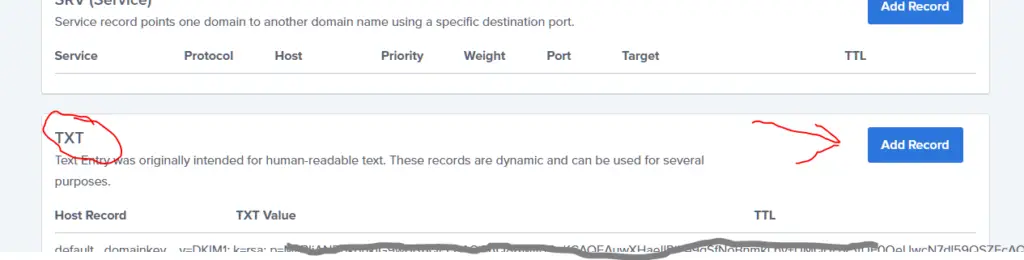
4 – Scroll down to the “TXT” section and click on the blue ‘Add Record’ button:
5 – Go back to the Facebook Business Manager, select the option “Update the DNS TXT record with your domain registrar” and copy the TXT record that Facebook lists in Step 2 of that page:
6 – Type an @ into the “Host Record”, paste the TXT record you just copied in Facebook into the “TXT Value” field, set the “TTL” dropdown to ‘4 Hours (min), and then click the blue “Save” button:
If your domain continues to say “Not Verified” inside of Facebook, simply click on the green “Verify Domain” button again or double-check that you set up your TXT record properly.
Once your domain is verified, you can now proceed to the final step before you can actually create a Spotify conversion ad inside of Facebook.
Next Steps For Setting Up Spotify Conversion Ads
Once you have installed the Facebook Pixel onto your website or music link tool and have verified your custom domain with Facebook, the next step is to set up “custom conversion events”.
This is just another one of those additional steps that Facebook makes you do because of the recent changes in iOS 14 and above.
Although Facebook has created a limit of 8 custom events per Facebook pixel, you will only really need 1 or 2 if you are just getting started running ads to grow your Spotify streams.
To learn how to do this, here are a couple of guides you can check out:
- How To Set Up The Facebook Pixel For Spotify Conversion Ads
- Music Facebook Ads & iOS 14: Complete Musicians Guide
And if you want to use a free end-to-end course that will show you how to get up and running with Spotify conversion ads, check this out: Facebook Ads For Musicians & Spotify Streams.


